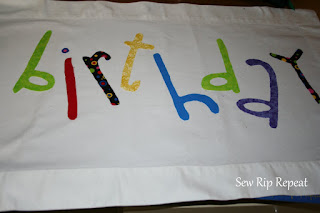
Birthday Table Runner
I've been on a table runner kick lately. I had bought three 8 ft. white table runners for only $9.99 from Pottery Barn's outlet awhile ago. They've been sitting just waiting for the perfect project. One of them is a birthday table runner for my buffett. Below is my inspiration that I had pinned on Pinterest.
First things first though I didn't want an 8 ft. table runner, I wanted a 4 ft. one for my buffett, so I cut it in half. The table runners have mitered corners so I had to finish up the end that I cut off before I could even get to the applique.
The original table runner had a 2" hem plus another 1/2" so I had to rip the seam down 10" to give me room to miter the end. I did this on both sides.
I ironed the runner really good and then folded in a 1/2" for the first hem. I folded again another 2" to match the hem for the whole table runner. As you can see from the picture above I also made sure that I matched the creases (that I couldn't iron out) from the original 2" hem on the side.
I matched my corners from the long end to the short end with the right sides together. I'm now ready to miter the end. I don't know if this is the right way or wrong way but this is what worked for me.
I took my square ruler and matched up the lines. As you can see where the crease is the ruler is marked at 2 (I hemmed 2") and then I matched up the skinny line on the ruler. I marked the line in a water soluable pen from one end to the crease. (Since I'm known to do things a few times no matter how many times I measure I did a basting stitch to make sure it was right.) I then turned it right side out to make sure the hems lined up all the way around the table runner. Flipped it back over and cut the end down 1/4".
Done! I now have 2 table runners but first things first we need to get on with the project at hand - the Birthday Table Runner. I printed out a font that I had downloaded. I loved everything about it but it was just to thin for what I wanted to do. So I thickened it up with a marker on both sides and transferred them onto fabric.
I used Steam-A-Seam for the letters. I've used it before and I like how I can re-arrange the pieces to my liking but also having the pieces only temporarily still stick.
Once I had the letters displayed how I liked them I was ready to sew. I ended up using a zig zag stitch and a variegated thread from Sulky in Black and White.
Once the letters were finished I debated on adding small presents, cupcakes, hats or even confetti all around the runner but it would have made it to crowded. I didn't want that.
As you can see I just placed the letters all over in a slanted and uneven manner.
We're ready now for cake and ice cream on our next birthday celebration.
Have a Great Day!
I'm linking to a few sites:


This is great! I have a very small sewing machine and honestly I'm scared to death of it...lol; not much of a sewer :-). Maybe when I get over my fear I'll attempt something like this. Thanks for sharing! Visiting via CSI Project Pinterest Challenge.
ReplyDeleteI just love that. I think your version is great. Love the bright colors!
ReplyDeleteThat turned out so adorable! Love it!
ReplyDeleteDropping by as the CSI guest judge this week. What a great project. I so wish I knew how to sew! I love that you took the idea from Pinterest and made it work for you. Great job!
ReplyDeleteI love that...you have done such a lovely job...we have birthday bunting that we hang...I might have to add a birthday table runner to that. xx
ReplyDeleteI am visiting from the CSI Pinterest Project link up. I love this idea and can't wait to make it to celebrate the birthdays in our house. Thanks so much for linking up!
ReplyDeleteI'm dropping by to let you know that I passed the Liebster award along to you. You can see it here.
ReplyDeletehttp://snicketythings.blogspot.com/2012/03/liebster-blog-award.html
Renonda @ Snickety Things
Cute Cute Cute! Jan
ReplyDeleteLooks cute and easy. A great addition to any birthday celebration. Peggy
ReplyDeleteI love that 8-foot table runner that you pinned, but yes a bit too long for me, plus I have a round table! Your birthday runner came out darling. I may have to make a runner for my grandson and daughter. Thanks for sharing a cute idea.
ReplyDelete