Posts

Graduation Flag

Image
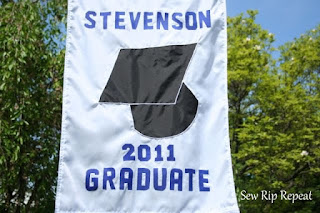
My oldest daughter is graduating soon. Her school was selling cardboard signs to place in your yard that said "Proud Parent . . . " but I proscratinated so long that they sold out of them before I could buy one. I really wanted people to know how proud we were of her so I thought of what I could do so the neighbors knew she was finally graduating. I finally decided to sew a flag. I used an old flag as my baseline for the width and height of the new flag. The school colors are blue and white and decided that a white flag with blue letters would be perfect. I started with a graduation cap that my husband enlarged at work. It wasn't large enough so I had to extend the measurements and redraw it. I decided I really wanted it to show on both sides so I cut out the black nylon. I then regular stitched all around the cap and cut out the white nylon on the other side. With that done I was able to satin stitch all around the cap. For the blue lettering I wanted to go with t...

Outside Chair Redo

Image
First of all it's been month's since I've posted anything. I've been working alot more than I usually do and haven't had the time. It doesn't mean I haven't been busy doing things because I have - it's just that I've been scattered all over the map on projects and it's time I started to focus. So . . . . . We've been going to the thrift stores in our neighborhood on Saturdays looking for some sort of something, anything! A few months ago my eye caught 2 ugly looking outside chairs. My husband walked right by these and I had to lure him back. He didn't see anything special about these two! Finally he  gave in saw my vision and for $3 each we brought 2 chairs home. The finish was more of a moldy gray, green color with a rough finish. I took them out on our back porch and gave them a really good scrubbing. We went to the local Home Depot and decided that we wanted to spray them black. I then ran drove to my favorite Kohl's to finish...

Pincushion

Image
Mark another new thing off of my to-do list - a yo-yo! I wonder who thought of such a funny name for a piece of fabric shaped in a circle, loosely stitched, and then pulled tight? They really are quite easy that I should think of something to put a lot of yo-yo's on. Love the button in the middle - it pulls it all together. I used scrap squares from my pillow  that I made. I don't know why I've never attempted to make pincushions before? They look so much better than the magnet ones. Spring has officially arrived but it looks like our weather isn't going to cooperate by the end of the week. I'm glad I finished up quite a few projects that I'll post in the near future. Have a great week!

Another Pillow

Image
Well I attempted another pillow with the same squares as the first one . This time I alternated with squares and rectangles. I even have the pieces going on an angle. I really love how this pillow turned out. I basically used the same pattern as my previous pillow but made this one a tad smaller so the pillow form fit better. I have the envelope style on the back so it is easier to wash and change to new pillows. I really need to get out of my comfort zone and insert a zipper but why spend money on a zipper - right? The purpose is to save money with the scraps that I have not spend money.  Have a great week!

Purple Bag

Image
The story behind this bag is this. We went to the North American Auto Show this year and I grabbed some free bags from a foreign auto company. (On my behalf I tried to get some American bags but they didn't have any left.) We won't name the company on this bag because my husband wasn't to happy that I would be parading this bag in public. As a matter of fact when he did go to the store with me those bags did not leave the back of my van. In my blog hopping and saving of patterns I found this bag  by Denyse Schmidt. Hope means alot to us in the "Motor City". Hope for a recovery for the auto industry and Hope for our Michigan and it's record job loss. The bag design is my own using handy dandy newspapers as my pattern pieces. The only thing I took from the other bag is the letters. Of course I had some Sew.Rip.Repeat. moments on this bag. The most obvious is the top. When it came time to put the handles on the bag I had no room. They went right into the letters ...

Shamrock Towels

Image
I was scheduled to work today but we received an unexpected day off of school because of road conditions and ice. Since I knew I was supposed to work, I had all my errands and cleaning already done. So what does one do when she has an unexpected day off? She sews! I still had the Valentine Towels  hanging in my little half bath and those just needed to be put away. We needed a pickup around here from all the snow we've had and the long, cold winter. We are all ready for spring to peek its head out and let the sun shine on all of this dreariness. To start I had plain, white Martex towels, and scraps of green fabric that I've also had stashed away in drawers. To start I cut out my heart pattern shamrock pattern and ironed it on my towel. I had purchased 2 different size binding tools that I really wanted to try so I cut my fabric and put it through the tool. Way to cool! Just push the fabric through and iron in place. Not much thinking involved. I ended up making 2 large strip...

My First Quilt/Pillow

Image
I can't believe it! I spent more time staring at those little squares than I did sewing and cutting. I never would have realized how much time can be spent arranging and rearranging those squares. I even changed my mind on the pattern I was going to use. Did I learn anything? You bet I did. For one thing if I'm going to have 2 white items together just make it one large item. I don't like how you can see the seam allowance in the white squares. Another tip I learned  is to write down a plan. I did this without a specific plan in mind. I had this jelly roll that I bought at Joann's just sitting around. I also took 1 large pillow that we didn't think was cushy enough for our heads and split it into 2 pillows. I sort of knew what size I wanted to go with but again not planning didn't make the sewing much easier. Another great tip I learned is to walk away when you have your strips laid out. I looked at these strips until I was blue in the face and I still ended up...